Getting set up with OX App Suite
This page contains a mix of tutorial videos and FAQs to help you get up and running as smoothly as possible.
These are the topics covered:
Quick Setup | Customize Your Experience | First Time Use | Collaborate
Let’s get you started with a quick overview

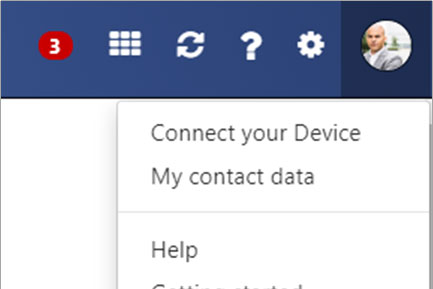
Enter your contact data
Setting-up your contact information allows you to share them as a Vcard in email.
Take a look at ‘Where can I find and change my personal contact data?’ for more details
Create your own email signature.
Signatures are the preset text that can appear at the end of your email. These can include salutations, your name, company and contact details as well as any other information you want to include.
You can create multiple signatures and choose which one you use whenever you like
Learn more here: ‘How can I create a new signature for my outgoing emails?’
Check your location, time zone and language settings are correct.
If they aren’t, please refer to this help article: ‘Where can I customize my basic settings?’
Connect your device
This quick tour guides you through the steps needed to connect your device.
To get started go to the settings menu and click on ‘Connect your device’.
Getting your settings right.
Setup your OX Mail app
Download them here:
![]()
![]()
Setup your OX Drive app
Download the OX Drive Apps here:
![]()
![]()
Make it your own: Customize your experience
There are many ways to customize your OX App Suite experience and make it work efficiently for you.
Add email accounts, RSS feeds or select and arrange the quick launch icons. Optimize OX App Suite so it works for you.

Want emails addresses to be saved automatically?
Simply define how and when you want to save incoming email addresses to your Contacts
For more, please read ‘How do I automatically save new email addresses?’
Want to work with multiple email addresses?
You can make OX App Suite your one-stop-shop for email by adding your other email accounts to OX Mail. Once added, you can send and receive email from these accounts as normal.
To learn more, click on ‘Unified Email’ or take a look at this help article: ‘How do I add another email account so that I can see all of my emails in one place?’
See your email the way you prefer.
In OX Mail you have a choice of views for your inbox, you can change the layout of your inbox between horizontal, vertical or list views.
Learn more hereabout all the options available here ‘How can I change the layout for viewing emails? or watch the ‘Email Overview’ tutorial video.
Define your quick launch icons.
You can select up to five quick launch icons from the settings menu. Work faster by clicking on one of these to start an app directly from the Menu Bar.
See the FAQ article for more details: Where can I customize my basic settings?

Fully customize your OX Portal.
If you want to customize your OX Portal you can find additional information here:
How do I add new widgets to the portal?
How can I customize the Portal?
Ready to get some work done?
It’s time to get you to work. After all, you got a job to do. Let us help you getting things done for the first time: First email to be send. Appointments and contacts to be created.
Find guides for each here.
Let’s take a quick look at this overview again.
For more details keep reading along or watch the video again if you like.

Ready for your first appointment?
The OX Calendar is a capable app that can really help you get organize
Get up to speed with this FAQ article ‘How do I create an appointment?’
You can find a more detailed intro to OX Calendar here
See all your calendars at one place.
To find out how to import calendars from other apps click here
OX Mail Overview
Want to add more folders to your Inbox?
Take a look at how you can use folders to organize your inbox here
How can I add new folders to organize my inbox?
How can I move my emails to other folders?
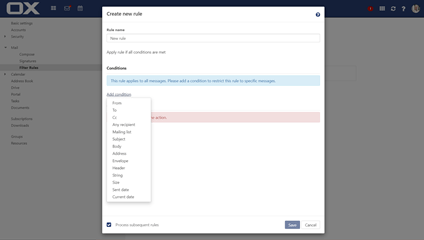
Organize your emails using Rules.
You can decide where your incoming emails are stored by creating filter rules. Decide where they go based on who sent them, subject, size, header, date and many other criteria.
Now, you are ready for OX Drive.
OX Drive is the central place for all your files. To discover the basics please Read ‘How do I upload a new file to OX Drive’, or get a full tour of OX Drive here
OX Guard for OX Drive
Learn how to secure your files with OX Guard
Collaborate with OX App Suite.
If you run any kind of business, chances are you work with others. You share files with customers, calendar with your colleagues or you work on documents with your partners.
Collaborate efficiently with the people around you with OX App Suite apps
OX Drive is the place to save all your files.
To understand more about the benefits of using OX Drive click here

Share your calendar
There are lot of sharing options with OX Calendar. Share your calendar with colleagues and let them read, review or manage your appointments. With permission management you can assign one of 3 roles to them: viewer, reviewer or author.
This level of permission management can be found across all of OX App Suite.
Work with others in real-time no matter where they are.
The advantage of OX Documents is that you can work with anyone online wherever they are. Take advantage of real-time editing or utilize the change tracking feature to work where you like when you like. Make changes, add comments and let your collaborator review your changes.
FAQ Articles:
How do I create a new text document, spreadsheet or presentation?
How can I edit a document real-time with other users?
Shared OX Address Book and OX Calendar
Learn how to share your address book and calendar
OX Documents brought to you by the original Open Office team
OX Documents is their newest brainchild. Professional, easy-to-use and with a great roundtrip experience, it works well with other office suites.
Creating a document, text, spreadsheet or presentation. It’s all there
Check out the FAQ article: How do I create a new text document, spreadsheet or presentation?
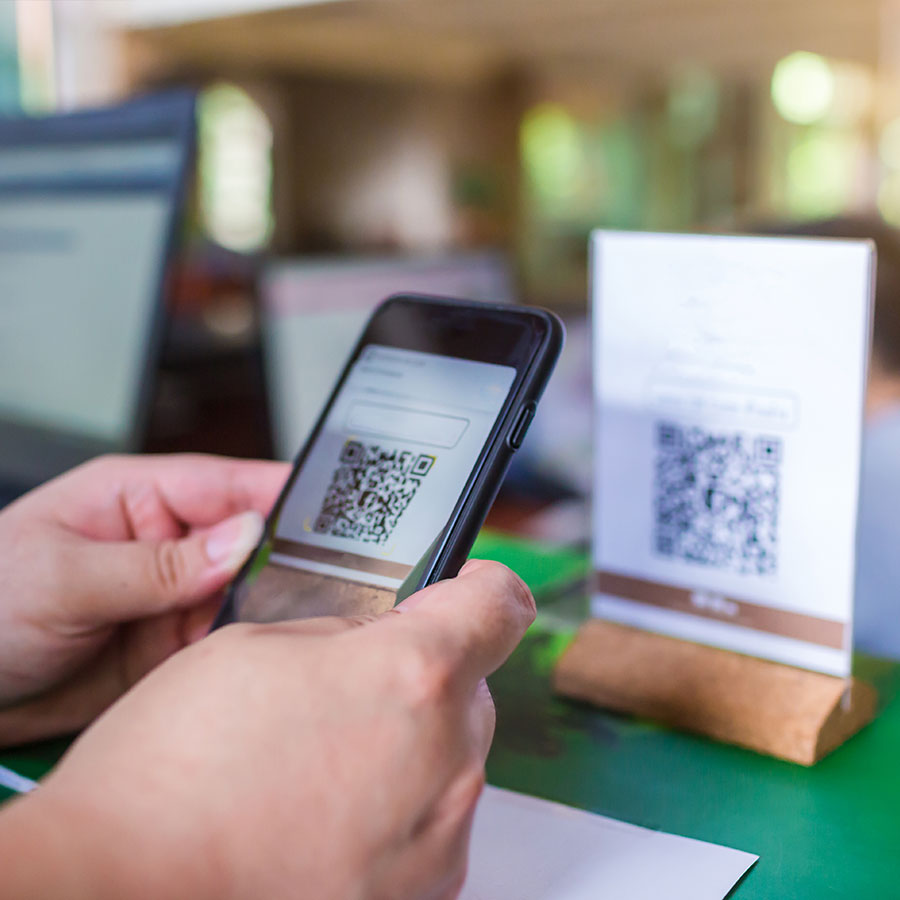
Connect your device
When using ‘Connect your device’ you will be asked to scan a QR code. After scanning, it will initiate the setup of your IOS device and connect your native email, calendar, reminder and contact apps with OX App Suite.
Please see how to scan a QR code below.
How to scan a QR code on an iPhone
iPhones come with a built-in QR code reader in the camera app. Just open your camera app, position your phone so the QR code appears on your iPhone screen. You may have to play around with the distance and angle to get it to read the QR code. Once the QR code is read, a notification will appear. Tap the notification to follow the steps to connect your device.
How to scan a QR code on an Android Phone
Not all Android phones have the ability to scan QR codes. The best way to figure out if your device can read QR codes is to open your camera app and point it steady for 2-3 seconds at the QR code. If scanning is enabled, a notification will appear, and you can follow the instructions to connect your device. If nothing happens, you will have to download a QR code reader app.
If your phone cannot automatically scan QR codes, you’ll have to download the app called QR Code Reader. Once downloaded, open the app, position the QR code in the widow and a pop-up option will appear. Follow the directions to connect your device.